Table of contents
Open Table of contents
- Intro
- You are already using worktrees
- What is actually a worktree?
- Worktree based workflow vs typical workflow
- Worktrees commands
- Better ways to work with worktrees
- Worktrees level 1: project folder
- Worktrees level 2: bare repo
- Caveats of worktrees
- Helper scripts
- BONUS: Visual Studio Code extensions
Intro
Do you know what is a git worktree? And if you do, do you actually use them at all?
If your answer is “no”, don’t worry: it’s the same for most developers out there.
That was also my case a couple of years ago, when I learned about git worktrees completely by accident. But since then, they have become the base of my development workflow.
The fact that worktrees have been part of Git since 2015 makes it even more surprising that they remain so rarely known. But what if I told you…
You are already using worktrees
Even if you don’t know it!
Let’s see what is going on with a freshly cloned repo:
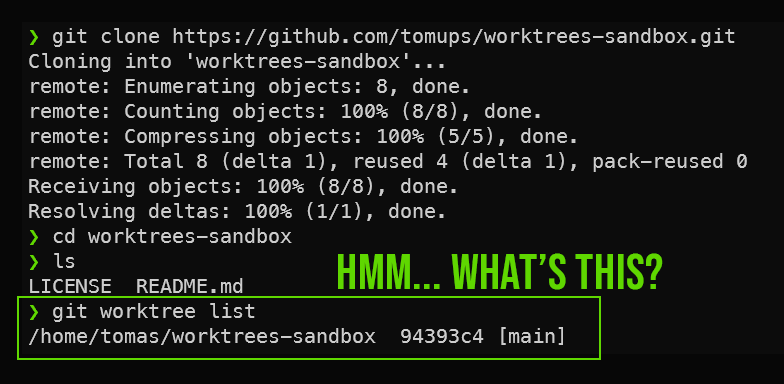
Yes, all git repos have a main worktree out of the box!

What is actually a worktree?
In fact it’s very simple: a working tree is the same as a working directory, this is, the directory with the files that you are working on.
That’s why the repo must have at least a main working tree, otherwise you would not be able to work with your files!
It helps to understand the structure of a git repo:
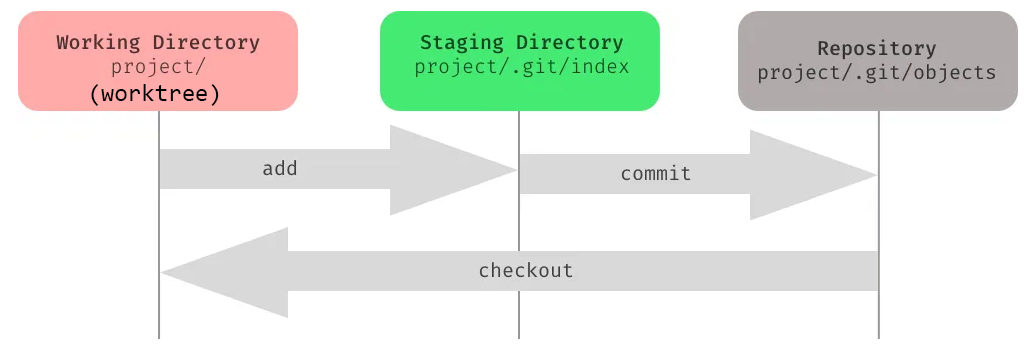
Original image by Zvonimir Spajic
OK, so then, what’s so special about worktrees?
Hmm… did you catch that? I wrote worktrees. Plural.
This is because a repository can actually have multiple working trees!
And most importantly, each worktree can point to a different branch.
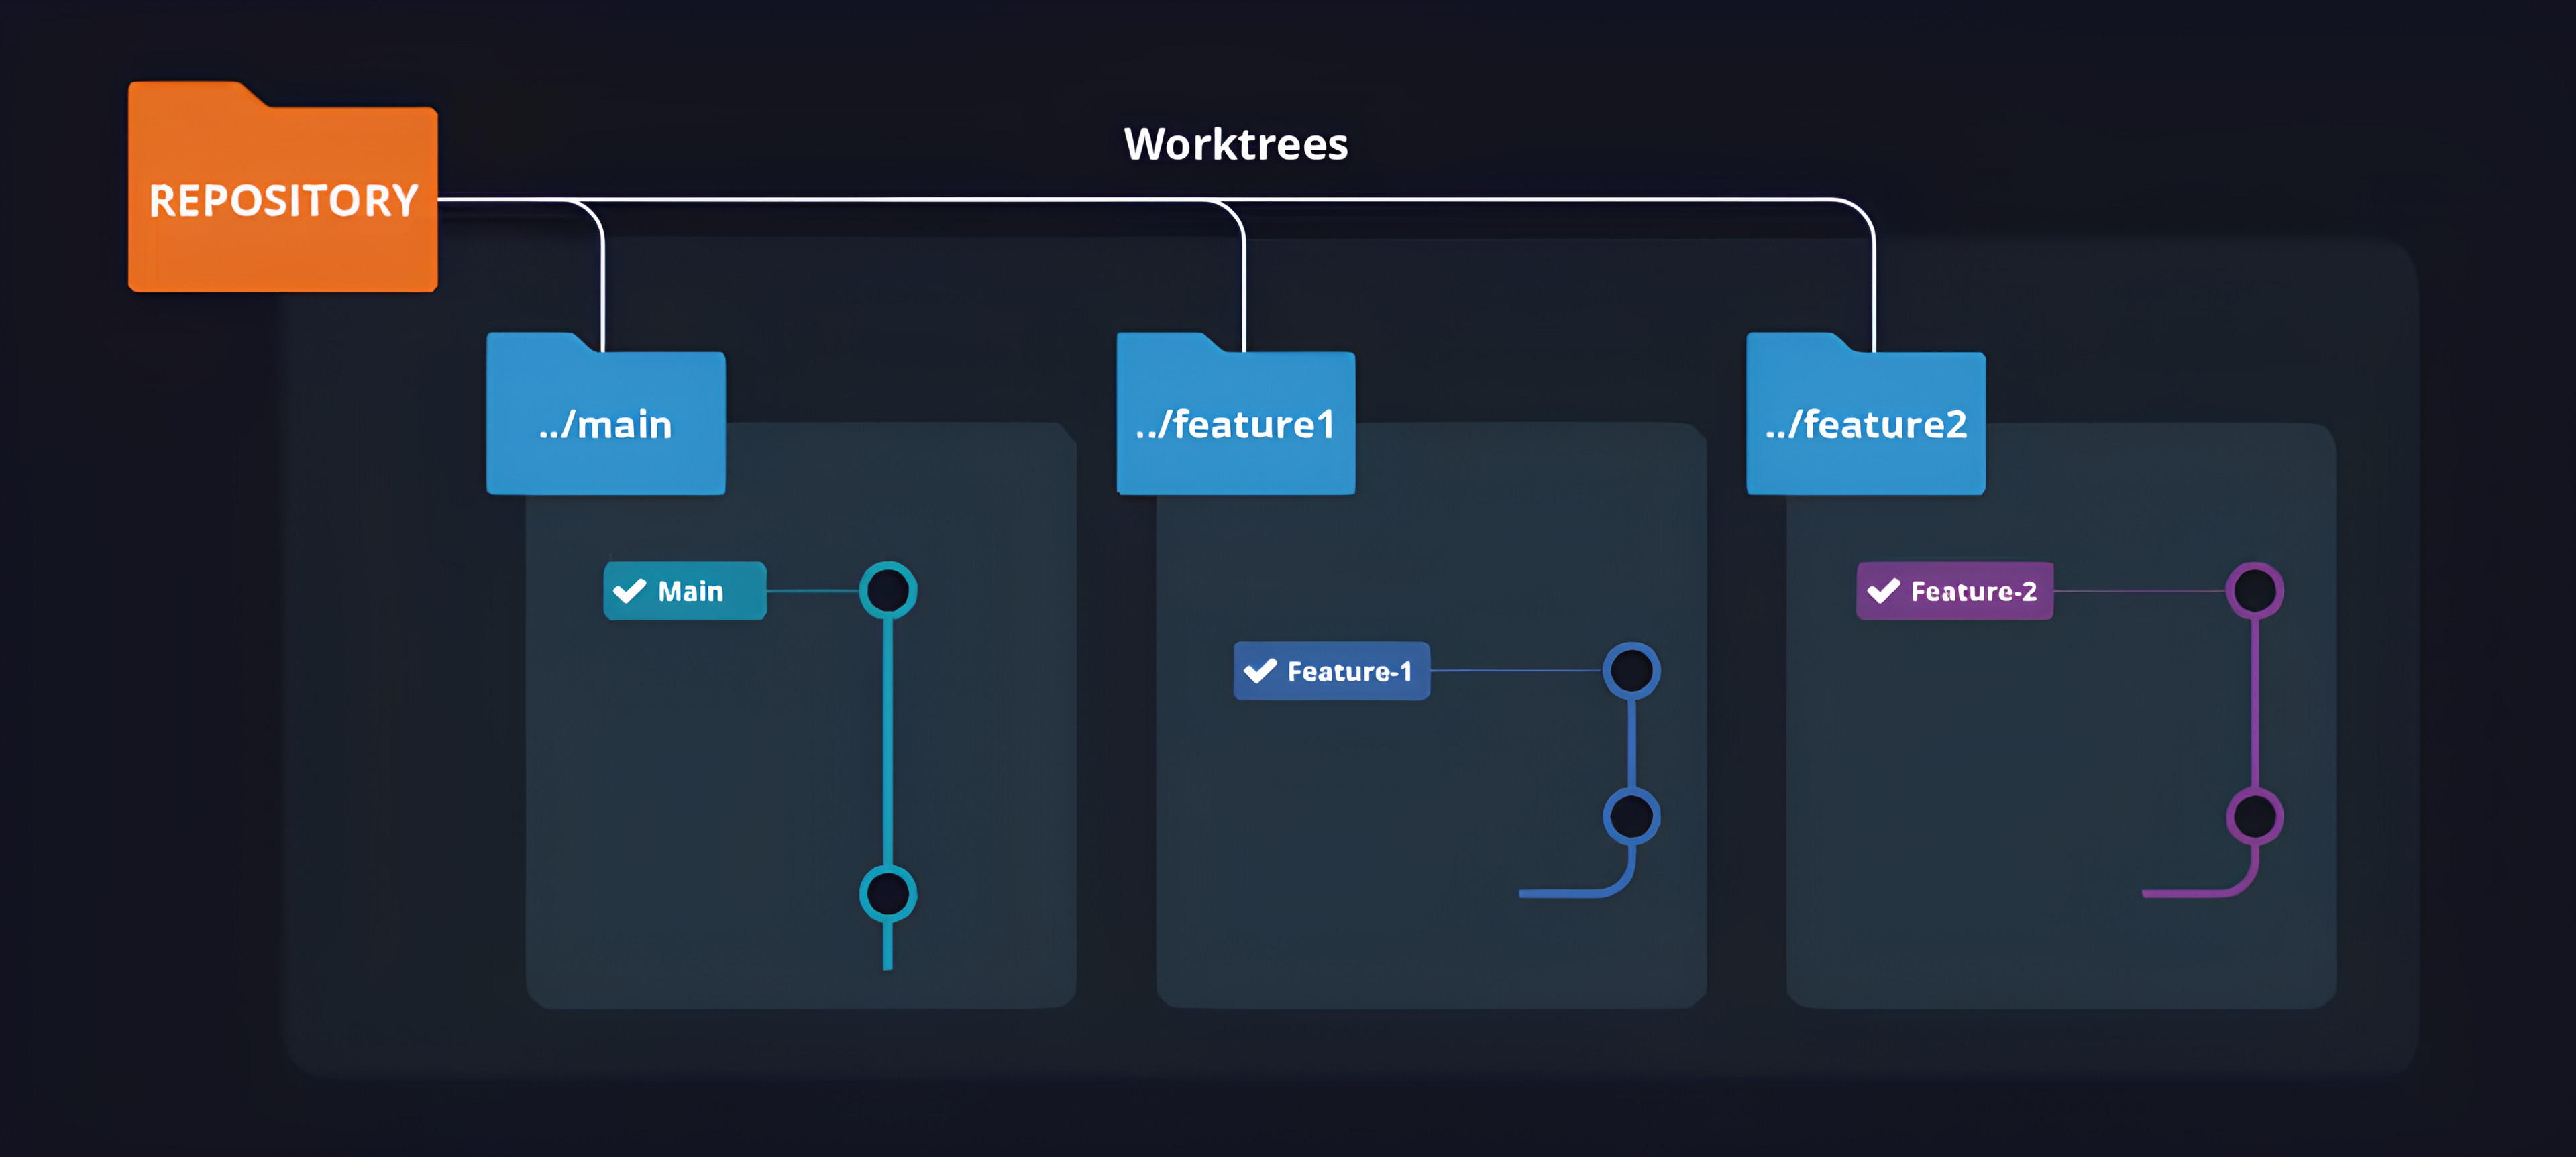
Original image by GitKraken
This means switching between branches is as easy as switching between directories!
This unlocks a much better workflow when you have to juggle between multiple branches.
Worktree based workflow vs typical workflow
You are working on that cool new feature, when suddenly the alarms go blaring 🚨. Production is down! You have to deploy a hotfix, and you have to do it fast!
What would you usually do? Most likely something like:
- Stage the changes of whatever you are working on (
git add .) - Stash them (
git stash push) - Checkout a new branch for the hotfix (
git checkout -b hotfix/my-fix) - Do the fix
- Stage, commit, push the changes
Phew! Now that the fire is out, you want to go back to the feature you left halfway, so you:
- Checkout back to the branch you were working on (
git checkout feature/my-cool-feature) - Pop the stash to recover your changes (
git stash pop) - Finally keep working
With worktrees, you can instead switch between branches just by changing directories, without losing any of your work in the process, even if it’s not committed.
Let’s do the same hotfix, but this time using worktrees:
- Create a new worktree (
git worktree add ../hotfix) cdto the folder (cd ../hotfix)- Do the fix
- Stage, commit, push the changes
cdback to the worktree of the feature you were working on (cd ../my-cool-feature)- Keep working like if nothing happened.
That’s a bit better, isn’t it?
Worktrees allow us to have much more flexibility for many other day-to-day tasks:
- 🔍 Code reviews: you can checkout the code and test it locally without disturbing your current work.
- 🔢 Maintaining different versions of a codebase: you can have a worktree for each version, and switch between them easily.
- 🧶 Stuck on a rebase and need to work on something else: you can leave it as is and just use another worktree.
- 🤺 Long-running tests or builds: no need to wait for them to finish, just move to another worktree.
Source: xkcd
Sorry but this won’t be an excuse anymore
I’m sure by now you are already thinking of even more use cases :)
Worktrees commands
Luckily, the basic usage of worktrees is very simple. Just a few commands!
-
git worktree add [path] [branch]creates a new worktree at the path specified, based on a given branch. -
git worktree remove [path]deletes a worktree. Keep in mind that this will delete the local folder, but the branch will still exist. -
git worktree listlists all the worktrees: useful to keep track of them when you have many.
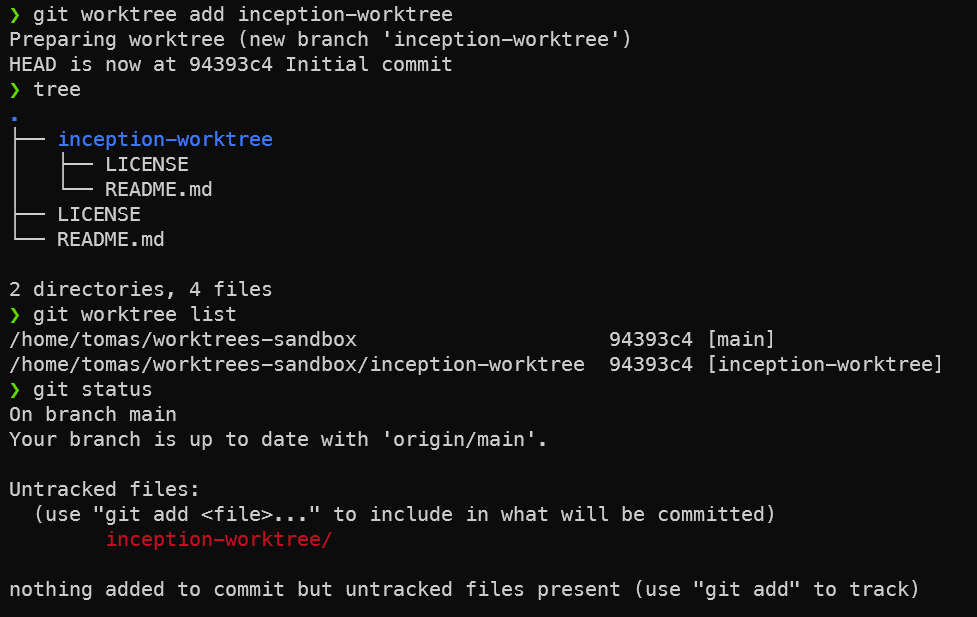
Here is an example of using the different commands:
Better ways to work with worktrees
The previous example shows the most basic way to work with worktrees, but there are better ways.
But before we start:
How NOT to use worktrees
Do not create a worktree inside another worktree!
So never do git worktree add new-worktree from within a working directory (notice how there is no ../).
This will create a new worktree inside the current worktree, which will be considered new content to be added to the repo… a total mess:

With that out of the way, let’s see the next level in using worktrees for your dev workflow.
Worktrees level 1: project folder
A better way to use worktrees is to have a containing parent folder for all of them, so they are not spread around in for example your home directory and mixed up with other projects.
For this, create a folder for your project, then clone the repo into a main folder inside it.
mkdir project
cd project
git clone https://github.com/example/repo.git main
This main folder will be your main working tree, always pointing to the main branch.
Based on it, you can create new worktrees with git worktree add ../[branch] [branch]
It would look something like this:
project
├── feature-1
│   ├── anotherfile
│   ├── LICENSE
│   ├── README.md
│   └── somefile
├── hotfix-1
│   ├── anotherfix
│   ├── fixfile
│   ├── LICENSE
│   └── README.md
└── main
    ├── LICENSE
    └── README.md
Here is an example of working with worktrees in this way:
This is a perfectly valid and very straightforwad way to work with worktrees. It might be enough for you.
But there is an even better way (in my oppinion).
Worktrees level 2: bare repo
A bare repository is a repository that does not have a working tree. This is usually used for hosting a remote repository, where developers can push their code but not work directly with it.
Then, how is this going to make it better to work with worktrees, you might be asking?
Let’s revisit the git repo structure graph we saw before:
Original image by Zvonimir Spajic
As we can see, a regular git repo has a .git folder that contains the staging area, metadata, et-cetera.
But this .git can not only be a folder - it can also be a text file, with a reference to any folder that contains the needed repo structure!
This little trick allows us to turn any folder into a git repo, backed by a bare repo located somewhere else.
With the proper setup, we will be able to create worktrees from the parent project folder, instead of having to be inside a worktree. This feels much more natural as we will no longer need to use ../ to create new worktrees.
To do it:
- Create a project folder and go inside.
mkdir project
cd project- Clone the repo as bare in a
.barefolder.
git clone --bare https://github.com/example/repo.git .bare- Create the
.gitfile, pointing to.bare
echo "gitdir: ./.bare" > .git- Make sure we can fetch remote branches (as by default bare repos don’t)
git config remote.origin.fetch "+refs/heads/*:refs/remotes/origin/*"- Create the main worktree
git worktree add mainFrom this point on, we can create worktrees from the parent folder without needing to use ../!
It’s a little bit more of set-up, but worth it in the long term.
Here is a recording of the whole process:
Caveats of worktrees
Unfortunately, not everything is perfect in the worktree world. There are a few cavetas that should be taken into account:
A branch can only be checked out in a single worktree
You can not have two folders pointing to the same branch. The reason is obvious - as soon as you change one, the other would be out of sync, as they share the same clone, but not their files.
Searching files from parent folder
If you search for a file from the parent folder, you will have duplicated hits for each worktree, as they are just regular folders with files.
This can be annoying for example in Visual Studio Code, if you use the parent project folder as the root.
Untracked files are not copied
When you create a new worktree, it is created from whatever is comitted, so gitignored or uncomitted files are not copied.
So if you have .env files, you have to copy them over manually. And for dependencies, like for example node_modules, you would have to run npm install again in the new worktree.
Helper scripts
If you end up frequently working with worktrees (hope so!), I have adapted some scripts from Bill Mill and Morgan Cugerone that will help setting up a bare repo in the proper way, and creating and removing worktrees with conveniences like copying some typically useful untracked files or removing orphan branches.
https://github.com/tomups/worktrees-scripts
They are added as git aliases, so you can use git wtclone instead of git clone, git wtadd instead of git worktree add and git wtremove instead of git worktree remove.
Hope they are useful! Any feedback and contribution is welcome :)
BONUS: Visual Studio Code extensions
There are two extensions that I can recommend for working with worktrees from VSCode:
Gitlens: This super popular extension has, among many other features, excellent support for git worktrees.
The downside: the worktree features is paid if you use them on private repos :( But if you don’t want to pay for it, there is a more basic free alternative:
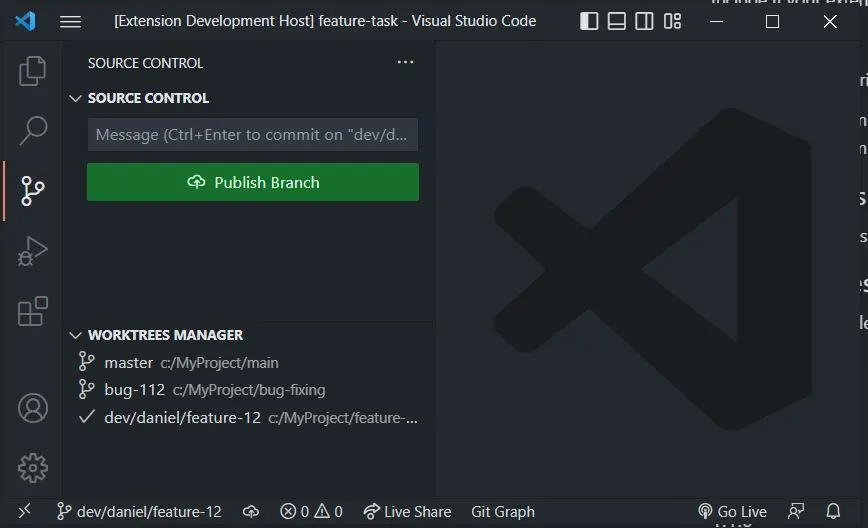
Git Worktree Menu: It adds a “Worktrees manager” pane to the source control tab, so you can easily create new worktrees and switch between them.
References: